Tiff Based RIP (User Configurable) - JobGenie
We have added the ability for the user to configure the input filters for the "Tiff Based Generic" to pick up any filenames that the user has. This is a highly configurable option allowing flexibility on searching, grouping and displaying of Jobs in the RIP Monitor.This can be used if the standard "TIFF RIP Generic" does not recognise the names of your jobs, or you wish to have more control on your current tiff configuration. This JobGenie can be used for the TIFF based and Panther RIPs as the job names and plates for both of these are taken from the file names.
Essentially, the JobGenie lets you configure which files to collect, which to ignore and how the files are grouped together to create a Job. To configure the JobGenie you must start the JobGenieEditor which you launch from the launch pad. Once you have configured a JobGenie you can then select it from "Tiff Based RIP" under the RIPs control panel.
Configuration
The guide to configuring the JobGenie will be handled as a tutorial giving a number of examples from simple ones to more complicated names. Some of the simple names can be picked up by the standard Tiff Based RIP, but these are shown here as easy examples. Throughout this tutorial, the following names will be used. These are all on the same machine as BlackMagic and cover a number of naming conventions and special plates.
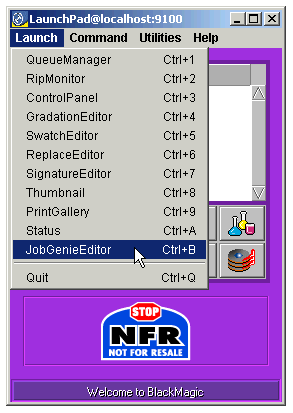
First, you must launch the JobGenieEditor. To do this select the launch pad and either type <CTRL b> or select the JobGenieEditor from the Launch menu.
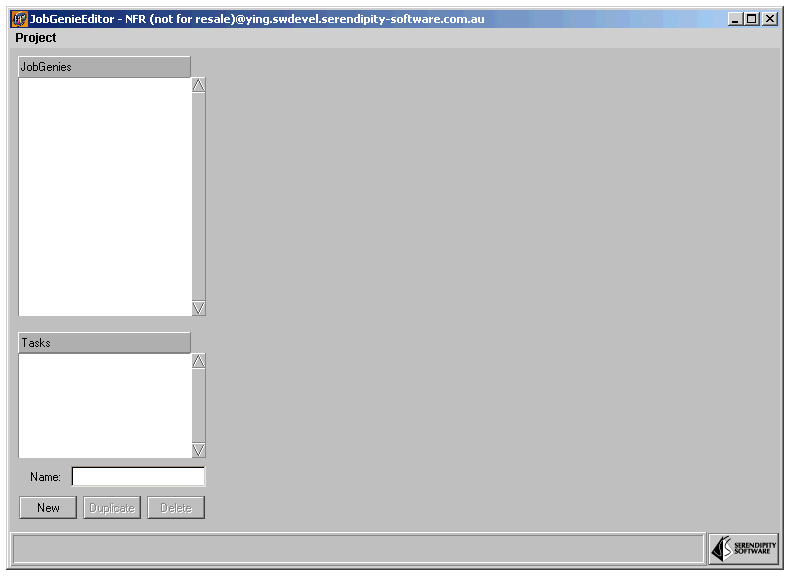
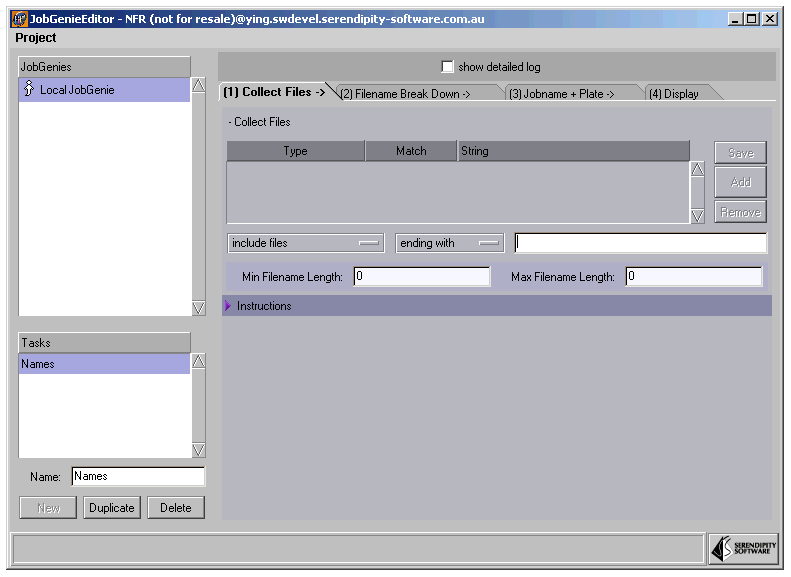
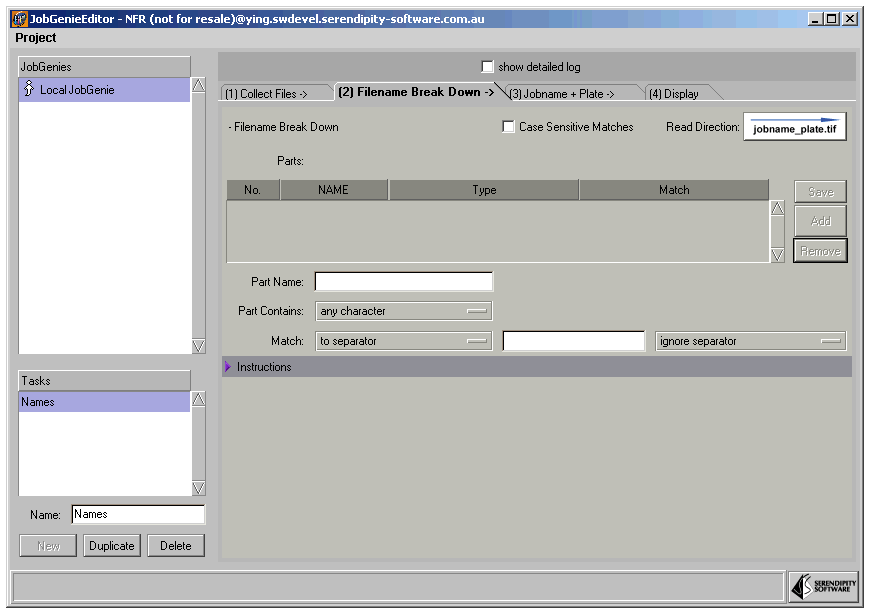
You will then be presented with the default JobGenie window.
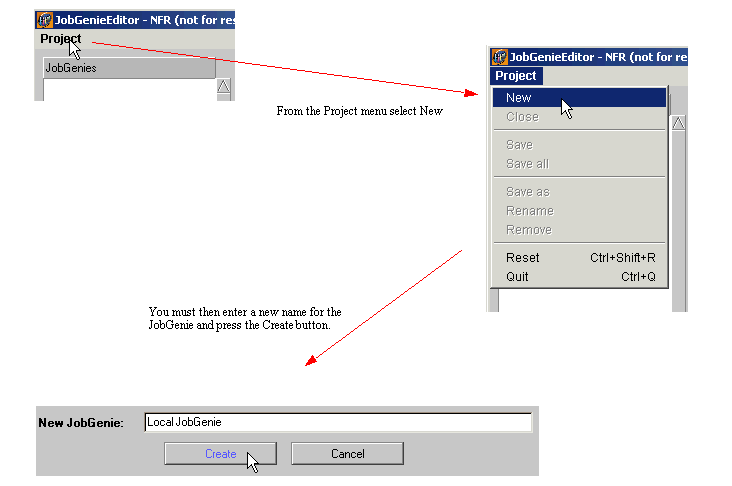
You must now create a New JobGenie
The JobGenie you create here will be available for selection under the TIFF RIP control panel. Each JobGenie can have a number of different tasks. Each task is a set of instructions that tell the Genie how your files are named. You may be able to use just one task, but if you have a lot of files in the same directory with very different names then multiple tasks will be needed in order to capture all the files correctly. For our examples we use eight different tasks, but most times 2 or 3 would be sufficient.
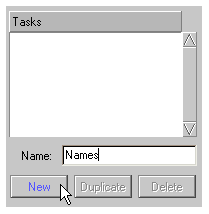
To create a new task, enter the name for the task and click the New button.
Once a new task has been created you will see the four stages that must be configured for the task to be valid.
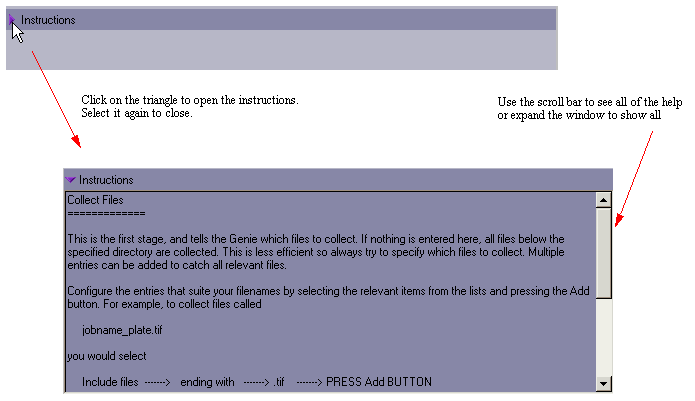
These have been split in to logical stages and you must work from left to right through each tab. You will notice there are a set of instructions at the bottom of each tab. These contain a brief explanation of the tab items and some examples. Click on the purple triangle next to the instructions to show the information.
Collect Files
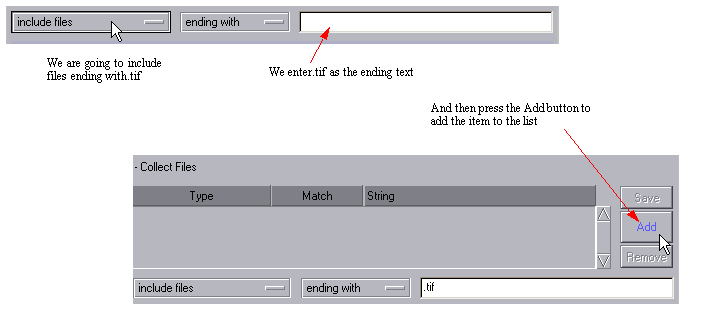
This first stage tells the Genie which files to collect and which to discard. You do not have to put anything in the first stage and it will look through all of the files that are below the path, but it is more efficient if you do. There may also be some files that you do not want to include in your task.In our example we are first going to collect files that are of the format jobname_plate.tif. So here we would configure the following
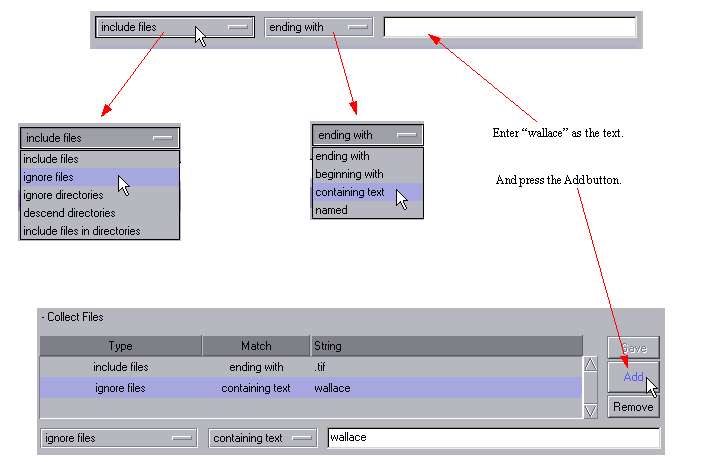
This will collect all files ending with.tif for consideration. Stage 2 and 3 determine if the files collected will be grouped into jobs or ignored. From our examples, we also need to ignore some files as they match this criteria and the following criteria but would not display properly. In the same directory there is a set of files called "wallace20_pms1000c_2685.tif", so to ignore these we do the following
Options
-
include files
-
ignore files
-
ignore directories - Specify which directories not to look in below the main search path.
-
descend directories - If this option is used then only the directories named would be searched.
-
include files in directories - This will only include files in a directory and ignore other files. If you have files very deep in a directory structure then this will prevent other files from being collected.
-
ending with - Files or directories that end with the specified characters
-
beginning with - This is the same as ending with but at the beginning,
-
containing text - This looks for files or directories that contain the defined text anywhere in the name
-
named - This is a literal match and therefore very specific.
-
Min filename length - You can specify the minimum length for a filename before it is collected.
-
Max filename length - You can tell the Genie to ignore files with names over a certain length.
Tips
Try to narrow down your collection of files to include the least amount of files to sort. This is more efficient and therefore faster.
Note: - Making changes - Important
If you need to make changes to any entry, highlight it from the list and the various configuration fields are filled in. Make your changes and press the `Save' button to save the changes back to the list. If this is not done then the changes will be lost. A common error is to make a change and save the whole JobGenie from the project menu and forget to save the list. This means that your changes to the list will be lost.
Filename Break Down
This is where we break the filenames that we collect into parts so that they can be identified. Each part of a filename can be given a name of your choice. It is helpful for these to be called something that is meaningful to the part like `jobname', `plate' and so on, as these will be referred to later in the configuration.
Any filename can be broken down into parts. Parts of a filename identify the name of the job and these are common to other files that make up the same job. Other parts identify the plates of a job, page numbers or editions of a newspaper. These parts will normally be separated in some manner, possibly by a full stop, underscore, space or a number. The parts maybe of fixed length and can be identified by the number of characters. All of these can be configured in this section. This is the stage that is going to tell the Genie what files go together to make up a job that you will see in the RIP Monitor.
The Filename break down tab is shown below
We must add the named parts to a list of parts that describe how our jobnames are made. Firstly we must choose which direction to read the filenames. You can either read them from left to right or from right to left. This determines which is the first part to be interpreted. Mostly, the plate will be in the last part of the name and the job name in the first part. Sometimes it can be easier to extract the plate name from the filename and then allocate the remainder to the job name. To change the read direction, click the arrow on the right side.

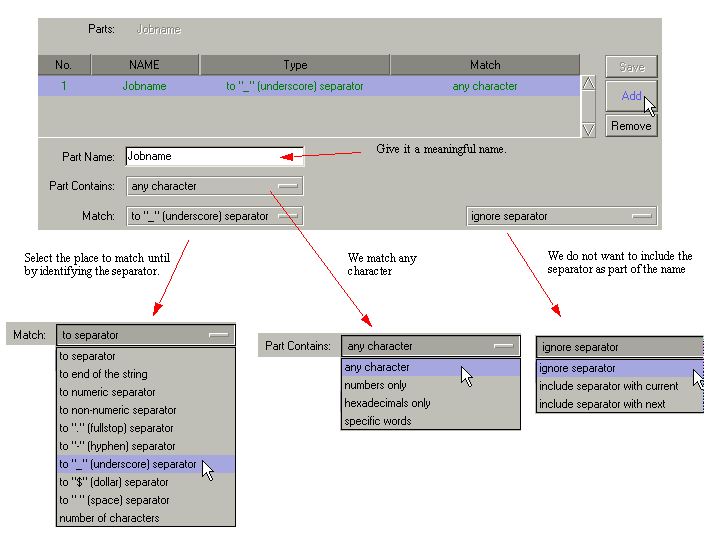
For our first example however (carrying on from the previous tab1), we will read from the left to right direction. We have our filename - TestPage9085_black.tif - that we must split up to make sure that the other plates link together to form a job. With reading from left to right we can see that the jobname is "TestPage9085" and the plate name is "black", with the remainder as "tif" which is the file type. These are separated by the underscore and full stop. So the first entry to the list will describe jobname as shown below.
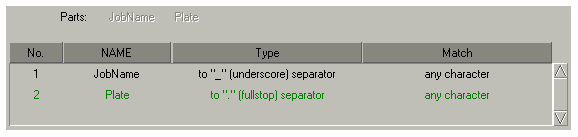
We now repeat the process for the plate entry. Make the Part Name be "Plate". Again, it can contain any character, but this time we are matching to a fullstop (.) separator. Again we do not want to include the separator with the part. Add this to the list so that you now have two entries which describe the "Jobname" and "Plate".
Options
Part Contains
-
any character - We will match to anything
-
numbers only - Only match numbers. So if a part to a separator had letters in as well, this would not match and therefore be ignored.
-
hexadecimals only - Match only hexadecimal numbers (numbers 0 - 9 and characters A - F)
-
specific words - Match exactly to the word in the text box.
Match
-
to separator - This gives you a text box where you can enter any separator to match until.
-
to end of the string - Match everything in this part until the end of the string.
-
to numeric separator - match until you see a number.
-
to non-numeric separator - match until you see anything that is not a number
-
to "." (fullstop) separator - match until the full stop.
-
to "-" (hyphen) separator - match until the hyphen.
-
to "_" (underscore) separator - match until the underscore.
-
to "$" (dollar) separator - match until the dollar symbol.
-
to " " (space) separator - match until the first space.
-
number of characters - match a specific number of characters.
ignore/include separator
-
ignore separator - do not include the separator in the part you are defining. i.e. discard the separator.
-
include separator with current - include the separator with the part you are defining. You may want this to display as part of the name.
-
include separator with next - include the separator with the next part you are defining i.e. the next part you add to the list.
See the examples at the end of this section for uses of other options
Note: - Making changes - Important
If you need to make changes to any entry, highlight it from the list and the various configuration fields are filled in. Make your changes and press the `Save' button to save the changes back to the list. If this is not done then the changes will be lost. A common error is to make a change and save the whole JobGenie from the project menu and forget to save the list. This means that your changes to the list will be lost.
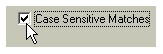
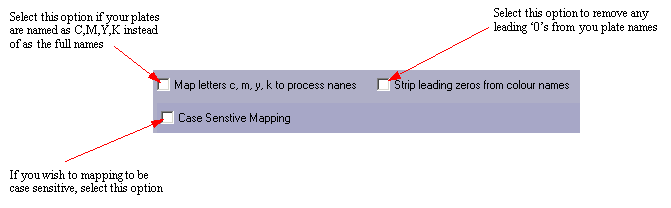
The only other part that you might want to configure is for case sensitivity.
If this is selected then the case will be checked and only parts that match case will be put together in a job. For example, if you had a filename JobName_Plate.tif and another filename of jobname_plate.tif, these would not be combined if case sensitivity was enabled.
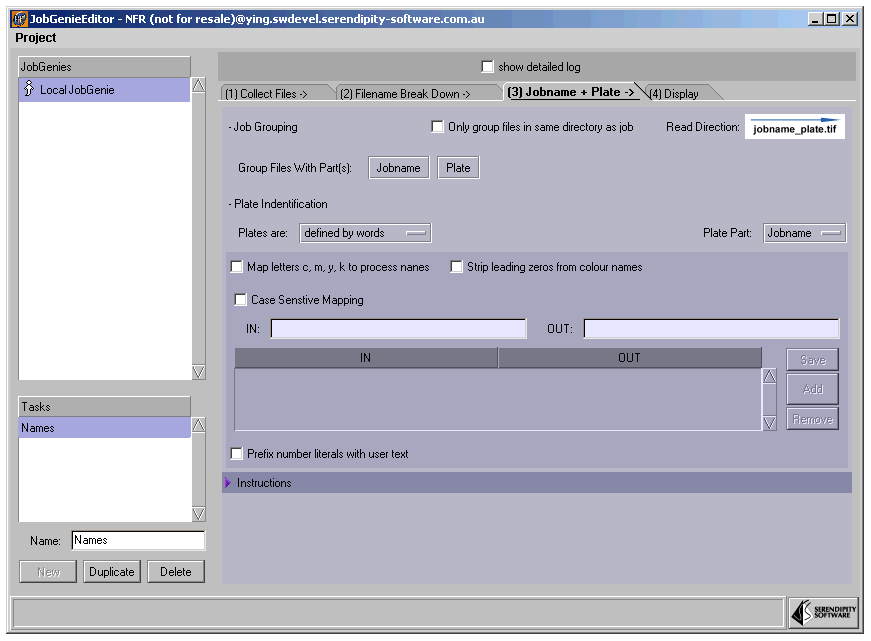
Jobname + Plate
This section lets you tell the Genie which part makes up the jobname and which makes up the plate. You also configure how the plates are named and organised.When you first move to this tab (tab3), you will see the names of the parts that you defined in the previous tab.
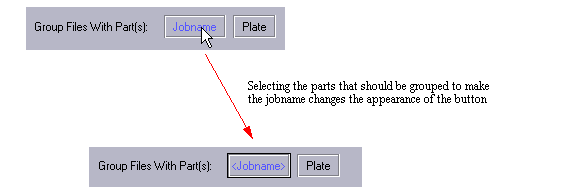
The first thing to do is to tell the Genie which part or parts make up the jobname. For our simple example, we only have one part and that was the part that we named "Jobname". Click on the "Jobname" button to group files with this part.
More than one part can be selected as the parts to group together. See other examples at the end of this section.
Next we have to tell the Genie what part is the plate identifier.
Once you have specified the plate part, you must tell the Genie how the plates are defined. These are either literal names, letters that represent the plates or as numbers. With our example our plates are as literal names so we select "plates defined by words" from the list.
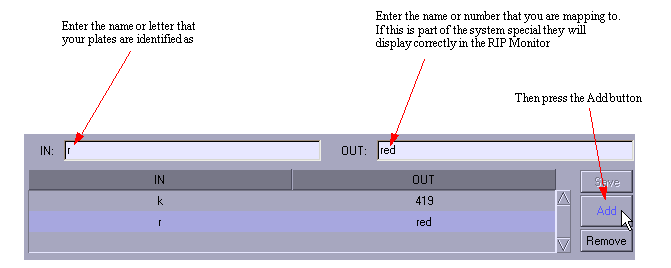
If you look back at the names that we are trying to capture, you will see that this task will get jobs with special plates of `r' and `k'. As we are defining the plates as words, these plates will not be allocated a special colour automatically but instead appear as S1 and S2 accordingly. We can overcome this by mapping the letters to real names.
Note: - Making changes - Important
If you need to make changes to any entry, highlight it from the list and the various configuration fields are filled in. Make your changes and press the `Save' button to save the changes back to the list. If this is not done then the changes will be lost. A common error is to make a change and save the whole JobGenie from the project menu and forget to save the list. This means that your changes to the list will be lost.
Options
There are a few other options on this tab.
You can also select an option to only group files that are in the same directory together. This means that if files match together e.g. have the same name, but are located in different directories then they will not combine to make one job.
There is also the option to prefix number literals with user text. This is useful if your job has plates that are pantone colours but just have the number as the plate description. You can prefix the plate number with the text Pantone so your library will pick the colour up.
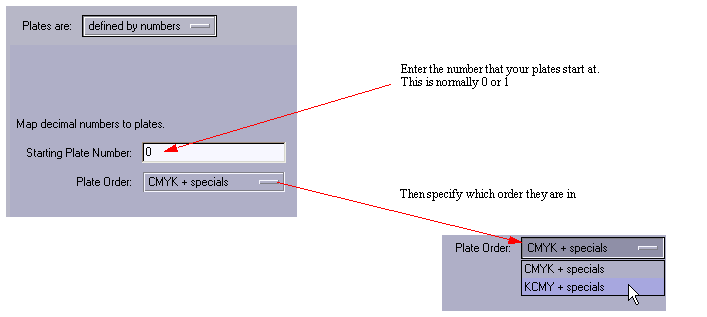
If your plates are defined by numbers then you must select that option from the "Plates are" list.
Once selected the options change enabling you to customise how the plates are numbered.
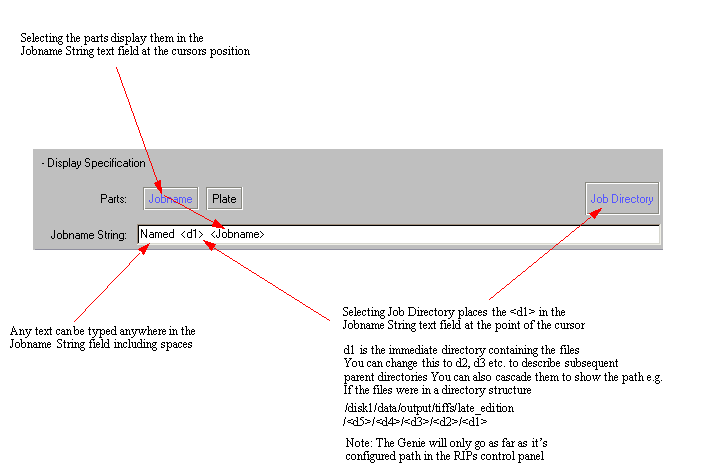
Display
This stage just tells the Genie what to display in the RIP Monitor. This can be any `part' of the name, directory or user defined text. Below is an example of this.
Return to main page